
Is a king-size high bed right for you? If done right, it absolutely should. Using this method to fill your raising bed can be a major benefit, especially if you want to focus your funds on the highest quality growing medium.The following content also has some reference value for raised garden beds.
But what exactly is "mega-culture" and why is it good for garden beds? Is this technique more valuable in a pristine hill form, or does it perform better in a raised garden? Does it really steal nitrogen from your soil and cause problems for plants?
Let's explore the ways of "giant culture" in more detail. We'll discuss which materials to include in your large culture bed, which definitely shouldn't be included, and why these things are important. We'll put the stuff on your bed. When we are done, you will set up everything you need to ensure the lifting bed is successful!
What is Hugelkultur?
This fun-sounding word (pronounced hoo-gell-culture or hoo-gul-culture depending on whom you ask) is actually the German word for "hill." In its original form, a shallow pit would be dug and filled with rotting wood, gradually forming a long, narrow mound. On top of the logs, pile up dirt to form a long, tall structure with more room for planting than a flat garden bed.
Initially, logs added volume to the bed. As they decompose, the mountain sinks, and the rotting logs inside retain extra moisture. As long as it's out there, it erodes the soil very little, and it becomes its own little ecosystem.
This is not the most commonly used method in raised garden beds. Of course, you can create a long, narrow bed by filling the center with logs and then piling earth on top of it to create a more traditional hill structure. But for most people who grow in high beds, they just want enough potting mix to make nice, horizontal beds.
Hugelkultur High Bed offers the best of both worlds. When you build a giant kultur bed, you use wood to fill your raised bed with less than half the material. Other materials, such as grass clippings, food scraps, coffee grounds, etc., can be used to fill around the wood to speed up its decomposition process. On top of all this, you will add your preferred planting mix.
This method allows you to utilize permaculture techniques to reduce the amount of material needed to fill your large bed. At the same time, you can reduce the amount of branches, logs, and other woody materials. Done right, the cultural part of your bed should be free and save you money.
Pros and cons of Hugelkultur beds
People attribute the vast Internet culture bed to a number of different benefits. Let's list some of the most common:
- Water less frequently
- Can deplete waste wood or prevent it from burning in a burn pile
- Increase the surface area of the garden bed
- Wood may generate heat as it decomposes
- Is an inexpensive way to build a tall garden bed
All of this sounds incredible, doesn't it? But like most things you find online, all of these things are good and bad.
Of course, a huge cultural bed might reduce water consumption to some extent. But most of its water-holding benefits are useless until the wood actually begins to rot, turning spongy and sharing water with the medium growing around it. If you start with huge logs, this can take several years.
Unless you plant a lot of trees, live in a forest, or live near an orchard, you probably don't have access to a lot of scrap wood. That means you may have to source your own wood. While there are some options for finding large logs, they may be larger than you want and you'll have to buy a log splitter to shrink them down to your desired size. Many people choose to buy a bundle of firewood and use it to build their bed, but if you want to build it cheaply, this may not be ideal.
Mounds built using traditional mega-cultural methods will increase the surface space on your bed. But what if you don't want to build a mound of dirt on a raised bed wall? You won't have the same increase in surface space; in fact, the space may not increase at all.
Most raised beds already warm up in the spring before the ground beds, so the warmer part is not necessarily necessary. But wood is also carbon-intensive and usually doesn't release much heat when it breaks down. It is a nitrogen-intensive material that provides heat as it breaks down.
So what are the benefits of building a giant cultural garden bed?
In my experience, the real benefits of a giant culture bed are as follows:
- Great ways to use twigs, small logs, wood shavings, scrap wood, and almost any other wood material
It acts as a reservoir under the bed
- Extremely cost effective
- Add lots of organic material to the soil
- Definitely reduces the amount of soil you need to make your bed
- Reduce compaction and contraction of the lifting bed
This is a more realistic description of hugelkultur applied to elevated bed Settings. It doesn't work miracles, especially when it's brand new... But over time, the benefits far outweigh the costs.
Does rotting wood steal nitrogen?
One of the most common problems, according to those who have experimented with Megaculture, is that decomposingwood robs the surrounding soil of nitrogen. Talk of planting failure is common,
In this case, all I have to do is ask them how much soil they put on the top of the mound.
You need more than half of the material in your raised bed for the soil you will be planting. Nitrogen loss occurs only in soil that is directly pressed against the wood, and your goal is to limit the amount of soil that is directly pressed against the wood.
The best way is to wrap the wood in a nitrogen-intensive material. Whether you're using thin twigs or thick wood, you'll want to line the sides of your bed with nitrogenous density several inches thick for best results and to help your bed break down evenly. The nitrogen-intensive material will also fill in any gaps that exist, keeping the soil where you want it to be.
If you put this nitrogen-rich green waste around your wood, you should not steal nitrogen as the wood breaks down. Assuming you will water as usual, some of the nitrogen will wash down through the soil over time, replenishing the nitrogen around the wood as it breaks down. Fertilize properly and you won't have any problems.
How to Layer Hugelkultur Overhead Bed
Now that you have a better understanding of what a mega-culture is and some of its pros and cons, let's talk about the right way to build a mega-culture high bed!
Appropriate frame
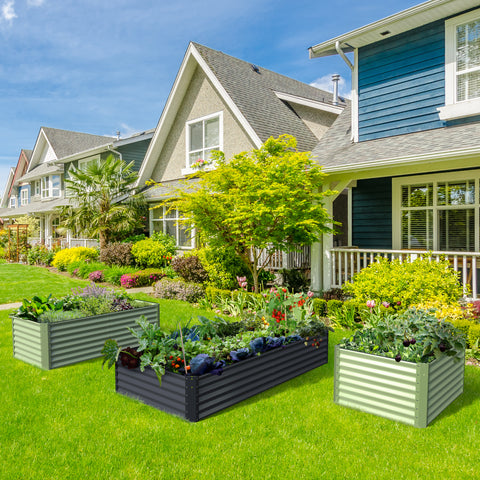
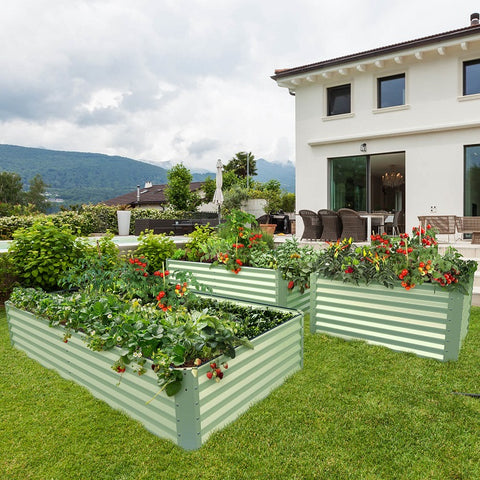
If you're using one of the Birdies raised beds sold at Epic Gardening stores, you've got a galvanized steel bed that will last for decades. It's the perfect frame for a garden.
You can also use a wooden bed frame, but keep in mind that the goal of the hugelkultur system is to break down the wood in the bed. Your wooden walls could be at risk, too. If you plan to use this method to build a wooden frame, be prepared to replace your side walls as needed. Choose wood that decomposes slowly, such as cedar. It may cost more, but it's worth it.
You can also make walls for your bed out of bricks, concrete blocks, or stones. These methods may cost you a little money at first, but they will last for years like a bird bed. The downside is that they will be thicker, which may reduce the available size of the bed itself.
Start at the bottom
One of the coolest things about giant culture beds is that you can reuse some of the soil already in your yard. If you have decent quality soil, this is a great way to make the most of your own topsoil while still raising the height to a more manageable level!
If you want to use this method, dig out a few inches of topsoil where your bed will be. Either leave some hard soil to support the sides of the bed, or bury some bricks under the walls of the bed to support them and prevent the bed from sinking. Put the dirt on a tarp and set it aside. You'll need it later.
Once you've made shallow trenches in your bed, fill them with a few inches of green waste. Pruning from your garden, grass clippings, fresh fertilizer, compost (either finished or unfinished compost), kitchen scraps, and the like are all good things to place in the first few inches of space. This creates a nitrogen layer that you can put wood in.
Work in your woods
Now it's time to find your wood. But it can't be just any old wood. You need to plan for this.
You want your wood to stay below the midpoint of the raised bed, but you also need to have at least 8 inches of pure soil to plant. So the height of the bed is important here.
A 30 "bed might have 15" of wood on it, because there's 15 "of soil on top of it. But a 15 "bed can only have 6" of wood at most. You must keep 8 inches of planting medium as the top layer for your gardening purposes.
For shallower beds, I actually recommend using twigs and twigs as a source of wood. Bundle them together tightly and use jute like twine to tie them up and compost them on the bed as well. If you can, stuff grass clippings or other organic material into each bundle to fill any gaps.
Taller beds can use taller wood, but still be below the midpoint of the bed. Try to use dry logs or logs that have started to rot, as this will allow you to start breaking them down.
Place an inch or two of green waste on either side of the bed while filling. Ideally, you'll have all of your wood wrapped in organic matter that will break down over time.
If you don't have logs, branches, or twigs, you can use wood shavings. But if you want, I recommend arborist chips, ones that have a lot of leafy material and trunk material. These chips break down faster because they come with a little bit of nitrogen. Still, beds using these branches should also add extra organic matter, since wood chips break down faster than larger branches and require more nitrogen initially.
Once your wood layer is in place, add more nitrogen-intensive organic material to it. Again, you need at least 2-3 inches. Really shove it in, push it down, fill in any gaps that exist. This prevents your soil from falling between two pieces of wood and also acts as a protective nitrogen barrier for the lowest layer of the soil.
But not that piece of wood
Several species of trees are thought to have allelopathy. The wood or bark of these trees contains compounds that act as natural herbicides and stop plants from germinating.
When you're going to put wood under the growing medium, you don't want to risk having those compounds somehow get into the area where the plant roots are. Therefore, it is best to avoid certain types of wood, leaves or debris when building large cultural sites, as this poses less risk to plants.
Common allelic trees include walnuts (especially black walnuts), eucalyptus, sky tree, Manzanita, sugar maple, red oak, sycamore, yellow flower, American elm, pepper, and black locust. The leaves or wood of these plants can pose a potential risk to your plants. Although they will eventually break down and lose dangerous compounds, it's best to avoid them in the first place.
Fill with your growing medium
Now that the cultural part of the bed is in place, the next step is to put back the soil you dug out from under the bed. Spread it evenly over the entire surface, enclosing your filler.
Most importantly, you need a soil medium with a lot of organic material that can hold a fair amount of water. I recommend a mix, like MEL's mix, or something with a lot of coconut husks and compost. You can add topsoil or other ingredients if you like.
If you're going to mix dirt in, make sure you know the type of dirt. Sandy soil may need a little extra moisturizing, so add extra coconut shells, peat moss, earthworm castings, or vermiculite. Clay should be broken down with lots of leaf mold, plant compost, horse manure or cow manure, etc. The silty soil should mix very well with the other ingredients to ensure that they don't sink straight down and form a thick, sticky layer on the logs or branches.
While you want this layer to retain moisture, you also want it to expel excess water. It should not form puddles on the surface. Before filling, take a can of the mixture and soak it in water. If anything stays on the surface for more than a few minutes, work in some coarse sand or add some perlite to provide better drainage.
Plant it and mulch it well
Now that your garden bed is full, it's time for the final step: planting and mulching. The best way you can prevent weeds from growing is to cover your soil completely. Where there are no plants, you want to cover them completely with mulch to reduce the chance of weeds growing.
In addition, hugelkultur's raised beds can help preserve moisture as the wood begins to compost. But like all garden beds, you need to reduce evaporation from the top few inches of the growing medium. Because your wood is new, it's a good idea to make sure you have something to slow the evaporation of the wood's surface during the first growing season or two. I often spread a thick layer of compost between the plants and sprinkle some wood chips on top. Taking this step can greatly reduce weeds and water waste. If you want to reduce water waste even more, use a soaking hose system to water under your mulch layer.
When you don't have to bend so far, it's a lot easier to plant your nurturing bed. You'll also find it easier to weed and water. For this reason, I love gardening on a raised bed, and so will you!


