Germinating seeds can be a tricky task. Keeping a close eye on their growth progress in the soil and maintaining optimal conditions in materials that easily lose moisture can be nearly impossible.
However, what if we told you there's a perfect solution that lets you watch your seeds grow under conditions that won't change suddenly? The tissue method is simple, mess-free, and halves the time it takes for your favorite seeds to sprout.

If this sounds like something to boost your gardening game, read on to learn how to germinate seeds using tissues and discover 10 useful tips for a successful seed starting experience!
What Does Germinating Seeds in Tissues Mean?
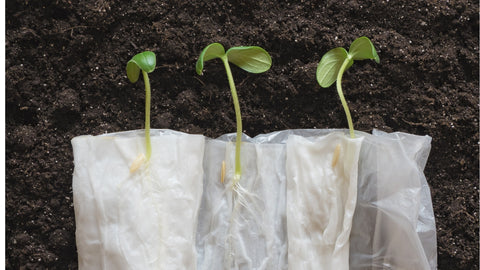
While you can directly sow seeds into the soil, it may mean not creating the optimal moisture climate for seed growth. Germinating seeds in tissues simply involves placing fresh seeds on moist paper material and letting them sprout.
The tissue method allows better control over all growth conditions, especially the temperature and moisture content of your mini "greenhouse." It's excellent for closely monitoring and documenting the growth patterns of your seeds.

Does It Benefit Seed Growth?
In the long run, germinating seeds in tissues is beneficial for seed growth because the beginning of the seed's life cycle is a crucial stage. It provides an easy way to monitor with tissues and allows you to know the seed's rooting status almost immediately before planting in the soil, saving a significant amount of time.
However, the delicate nature of extracting seeds from tissues when moving them to soil can impact seed growth. Care must be taken, especially with the sensitive early roots, which can easily break. Tweezers should be used to minimize the risk of damage when placing them in the soil.
Method for Germinating Seeds in Tissues:
Materials You Need:
- Tissues, filter paper, or newspaper
- Transparent ziplock bag (sandwich size)
- Water
- Your choice of seeds!
Directions:
- Tear the chosen paper into pieces approximately the size of a book.
- Dampen one half of a piece of paper or tissue.
- Place about five seeds evenly spaced on the damp half of the paper, then fold the other half over the seeds.
- Open the ziplock bag, ensuring it's large enough to accommodate the tissue without crushing it.
- Insert the seeds into the bag, then reseal it. Leave enough air inside as the bag will act as a greenhouse, maintaining moisture.
- Now, all you need to do is wait for the seeds to sprout. They should be kept at room temperature, avoiding direct sunlight.
Where Should You Plant Them After?
The next step is a bit tricky as you have to extract the delicate seeds from the tissue and transfer them to soil or an alternative medium like vermiculite.
Vermiculite is a mineral that serves as a moisturizing material for new plant growth. These should still be planted indoors, so use pots or other containers, especially if the weather outside is cold.
To take them off the paper, you'll need a pair of tweezers, as the roots are too fragile to touch with your hands. Carefully pick up the seedling with tweezers, placing them gently into damp soil. There should be a pre-made hole for the seedling to enter—don't push them in, or they may break!
Once the seedling is in the soil (with the entire root system able to fit into the hole), secure the seedling in place and brush soil over its top. However, if the seeds have already sprouted some leaves, avoid placing those leaves under damp soil, or they may rot. If they're present, stick them together!
After a few weeks of indoor growth, you can move the seedlings outside and plant them in moist soil when the weather is warm.

Which Seeds Pair Well with the Tissue Method?
Almost every seed can be germinated using the tissue method. It works similarly to planting directly in soil, but you introduce more moisture and heat into the initial growth process, making it more efficient.
Ideal seed choices for this method include:
- Peas
- Tomatoes
- Summer squash
- Peppers
- Lemons and oranges
- Pumpkins
However, you need to remember that the sprouting time for these seeds may differ. Check the seed packets (or give them a quick Google) to see how long they take to germinate.
10 Tips for Germinating Seeds in Tissues:
-
Use a Gardening Journal: Keeping a gardening journal is a fantastic way to track all seed and plant growth. You can flip through this book to see what works, how it works most effectively—ultimately making you the ultimate gardener by learning continuously.
Additionally, taking the time to write in a journal is lovely, whether it's recording accounts, sketching, or drawing your garden masterpiece.
-
Plant the Seeds with the Longest Germination Time First: This is perhaps the most crucial tip. Some seeds can sprout in a week, while others might take a day. As mentioned earlier, if you plant different types of seeds in one tissue, extracting some seedlings before others are ready can be challenging.
Besides, the tissue method can speed up most germination times. Starting with the longest germination time allows you to witness the acceleration of their growth process. Then, you can adjust your planting for shorter germination times.
-
Space Out Your Germination: This tip might sound peculiar to outsiders, but if you love gardening like we do, you'll want to make the most of your growing time!
Since this method is straightforward, it's easy to set up a whole batch of seeds and plant them all at once. However, if you do a few seeds/one type every few nights, you'll have a continuous supply of seedlings to observe. This way, you can enjoy waking up to fresh sprouted seeds every day!
-
Prepare the Right Type of Soil for Your Seeds in Advance: In gardening, you can never be too prepared. Besides, predicting the exact germination times for different seeds can be challenging—especially with the tissue method, which surely speeds up everything.
If you have the soil ready for transplanting before the time comes to move the seeds, you won't risk leaving the seeds in plastic bags for too long, which could lead to rotting.
-
Monitor for Any Issues: One great thing about the tissue method is that it allows you to observe seedling growth. This is crucial in the early stages of germination when you're unsure if your seeds are viable or if you have the right conditions for them to grow.
Consistently checking the sprouting seeds is a good practice, as it lets you notice any growth issues!
-
Label Seed Types and Dates on Plastic Bags or Tissues: Alongside a journal, this is a good method for keeping track of what you're planting and where/time.
Knowing the exact date you started germinating seeds is always useful, as it allows you to calculate how long each type of seed will take to grow, providing a good reference point for using the tissue method.
Also, if you label the seed type, you won't make the mistake of planting "tomatoes" after germination and ending up with zucchinis!
-
Patience is Key: If your seeds aren't growing within your expected time frame, don't get discouraged. While the tissue method undoubtedly speeds up germination, there are still many factors affecting seed growth speed.
While we recommend checking the condition of seeds in the bag (just to ensure there are no easily solvable issues), some seeds naturally take longer to germinate. This is especially common if the seeds are a bit older.
-
Regularly Check the Moisture Content of the Tissues: The success of germination can be determined by the wetness or dryness of the tissue. Like the principles of a greenhouse, the plastic bag containing tissues and seeds needs a lot of moisture and humidity to germinate. Without moisture, they'll only dehydrate!
On the other hand, if there's too much moisture in the bag or the tissues are too wet, it can lead to the decomposition and rotting of your new seeds. This is because they struggle to germinate in waterlogged conditions, and when germination takes too long, they degrade.
You should know within a day or two whether the moisture conditions are suitable for seed germination.
-
Keep Checking for Sunlight: The easiest way to find out if your seeds need sunlight for germination is by checking the packet/internet! If a particular seed does require direct sunlight, simply placing it on a counter that occasionally sees sunlight might not be enough.
The best way to ensure seeds germinate in sunlight conditions is to place them on a sunny windowsill or even a glass door.
However, we always advise checking the seed packet to see how they recommend getting the right amount of sunlight.
-
Check the Date if Using a Seed Packet or Track the Age if Collecting Seeds Yourself: The average lifespan of seeds is about one year. While some seeds can work up to two years, this significantly lowers their chances of germination.

Even if seeds are past their prime, it doesn't mean you won't be able to revive them! To rejuvenate expired seeds, you can try rubbing the seed's outer shell with sandpaper.
Though it can be a tricky process, especially with tiny seeds, the abrasion caused by sandpaper is expected to create enough gaps for manual water absorption. With increased moisture, your old seeds might just start sprouting.
Another simple method to germinate old seeds is to moisten tissues with carbonated water. The carbon dioxide in the soda will further push water into the seeds, giving them a new lease on life.
Finally, you can attempt to split the spine of the seed with a small knife. Warning: This should be done by adults!
As you cut the seed, it provides a large surface area for water absorption into the seed. This is the last resort for germinating old seeds, so if this doesn't get them to sprout, it might be time to discard them and purchase/look for a new batch.
In Conclusion:
Germinating seeds in tissues is a great method to kickstart seed growth. It not only accelerates the germination process but also reduces the time you spend digging around soil!
Moreover, when your seeds germinate in the soil, it's challenging to observe their growth speed or whether they are viable and fully growing.
The tissue method allows you to clearly see the entire process, enabling you to document how different types of seeds germinate. This information can be incredibly useful for future gardening endeavors.


